Activity 32: POSTMAN
A Short Introduction of Postman
Postman is a popular tool used by developers for API testing, documentation, and collaboration. It simplifies the process of testing APIs, making it easier for developers to ensure that their APIs work correctly. In this article, we will provide a beginner’s guide to getting started with Postman.
Given API Resources
+-----------------------+--------+---------------------------------------------------+---------------+------------------------------+
|       API Name        | Method |                      API URL                      | Authorization |          Body Json           |
+-----------------------+--------+---------------------------------------------------+---------------+------------------------------+
| Register              | POST   | https://api.bernand.click/register                | -             | { username, password, name } |
| Login                 | POST   | https://api.bernand.click/login                   | -             | { username, password }       |
| Refresh Token         | POST   | https://api.bernand.click/refresh                 | Bearer        | -                            |
| All Tasks             | GET    | https://api.bernand.click/task                    | Bearer        | -                            |
| Insert Task           | POST   | https://api.bernand.click/task                    | Bearer        | { task_name }                |
| Get Task By ID        | GET    | https://api.bernand.click/task/get/:id            | Bearer        | -                            |
| Get Task By ID Params | GET    | https://api.bernand.click/task/params?id_task=:id | Bearer        | -                            |
| Get Task By User      | GET    | https://api.bernand.click/task/user               | Bearer        | -                            |
| Update Task           | PUT    | https://api.bernand.click/task/:id                | Bearer        | { task_name, status }        |
| Delete Task By ID     | DELETE | https://api.bernand.click/task/:id                | Bearer        | -                            |
+-----------------------+--------+---------------------------------------------------+---------------+------------------------------+
Section List
Section 1: What is Postman?
Definition of Postman
Key features of Postman
Why is Postman popular among developers?
Section 2: Installing Postman
How to download and install Postman
Setting up a Postman account
Introduction to the Postman interface
Section 3: Creating and Sending API Requests
Creating a new request in Postman
Adding request parameters and headers
Sending the request and viewing the response
Store the Response Data to Environment
Adding the Authorization Bearer
Section 4: Organizing Requests and Creating Collections
Creating and organizing requests into folders
Sharing and collaborating on collections with team members
Section 5: Testing APIs with Postman
- Writing test and Using Postman’s assertion library to check API responses
Section 6: Debugging and Troubleshooting with Postman
Using the Postman Console for debugging
Troubleshooting common issues with API requests
Section 1: What is Postman?
- Definition of Postman
Postman is a popular software tool used by developers to test, document, and collaborate on APIs (Application Programming Interfaces). It allows users to create, send, and receive HTTP requests, and to view and analyze the responses. Postman also provides features for organizing requests into collections, writing and running test scripts, and sharing collections with team members.
Website : https://www.postman.com
- Key features of Postman
Postman has many powerful features that make it a popular tool among developers, some of t the key features include:
API testing: Postman allows developers to create and run tests for their APIs, making it easier to detect and fix issues in the API.
Collections: Users can organize and group their API requests into collections, making it easy to manage and maintain the API.
Automated testing: Postman allows users to automate the API testing process, making it faster and more efficient.
Collaboration: Users can easily share their collections with team members, making it easier for teams to collaborate on APIs.
Documentation: Postman can automatically generate documentation for APIs, making it easier for developers to understand and use the API.
Mock server: Postman provides a mock server that allows developers to simulate an API response, making it easier to test client code without actually calling the API.
- Why is Postman popular among developers?
Postman is popular among developers for several reasons, including:
Ease of use: Postman has an intuitive and user-friendly interface, making it easy for developers to get started with the tool.
Versatility: Postman can be used for a wide range of API-related tasks, including testing, documentation, and collaboration.
Extensive feature set: Postman has a wide range of features that make it a powerful tool for API development and testing.
Integration with other tools: Postman can integrate with other tools, such as GitHub and Jenkins, making it easier to incorporate API testing into a development workflow.
Community support: Postman has a large and active community of users who contribute to the development of the tool and provide support and resources for other users.
Section 2: Installing Postman
- How to download and install Postman
To download and install Postman, follow these steps:
Go to the Postman website at https://www.postman.com/downloads/.
Choose the version of Postman that is appropriate for your operating system.
Once the download is complete, run the installer and follow the instructions.
Click Download Button
Then, Click postman.exe and Install into your Machine.

Download Postman (for Windows)
- Setting up a Postman account
To set up a Postman account, follow these steps:
Go to the Postman website at https://www.postman.com/.
Click on the “Sign up for Free” button in the upper-right corner of the page.

Sign up Postman
3. Fill out the registration form with your name, email address, and password.
4. Click on the “Create free account” button to create your account.

Sign up Form
- Introduction to the Postman interface
When you first open Postman, you will see the main interface, which is divided into several sections :
The left-hand side of the interface contains the navigation pane, which allows you to access your collections, environments, and APIs.
The center of the interface is the request builder, where you can create and send HTTP requests.
At the top of the interface, you will find the main menu, which provides access to features such as creating workspaces, postman settings and account settings, and sharing collections with team members.

Postman Interfaces
Section 3: Creating and Sending API Requests
- Creating a new request in Postman
To create a new request in Postman, follow these steps:
- Click on the Collections in the left pane then Click “+”button in the upper-left corner of the interface.

Create Collection
2. Enter the Collections Name

Fill Collection Name
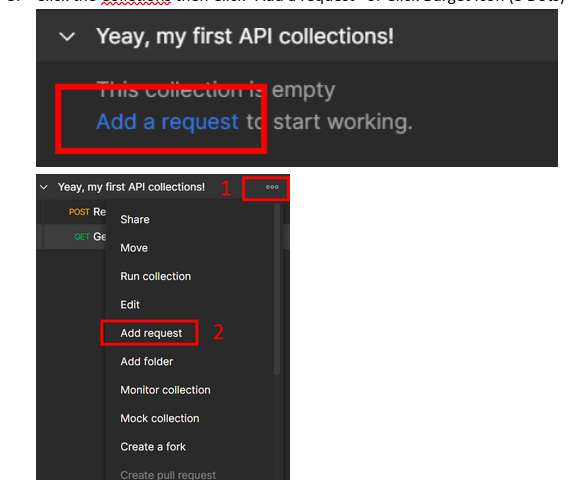
3. Click the Collections then Click “Add a request” or Click Burger Icon (3 Dots)

Add Request
4. Select the HTTP method that you want to use for the request (e.g., GET, POST, PUT, DELETE, etc.).
5. Enter the API endpoint (i.e., the URL of the API that you want to call).
Endpoint : https://api.bernand.click/register

Add Endpoint API
- Adding request parameters, body and headers
To add request parameters, body and headers in Postman, follow these steps:
- Click on the “Params” tab in the request builder section to add request parameters.

Add Endpoint API Params
2. Click on the “Headers” tab in the request builder section to add request headers.

Add Endpoint API Headers
3. Click on the “Body” tab in the request builder section to add body request.
4. Enter the parameter, body or header name and value in the appropriate fields.

Add Endpoint API Body json
- Sending the request and viewing the response
To send the request and view the response in Postman, follow these steps:
Click on the “Send” button in the request builder section to send the request to the API.
The response from the API will be displayed in the response viewer section of the interface.
You can view the response body, headers, and status code in the response viewer.

Sending Request
- Store the Response Data to Environment
To store the response data to Environment, follow these steps:
Click on the “Tests” tab in the request builder section.
Add the following code :

Store Response to Environment Variables
Adding the Authorization Bearer
To add the Authorization Bearer, follow these steps:
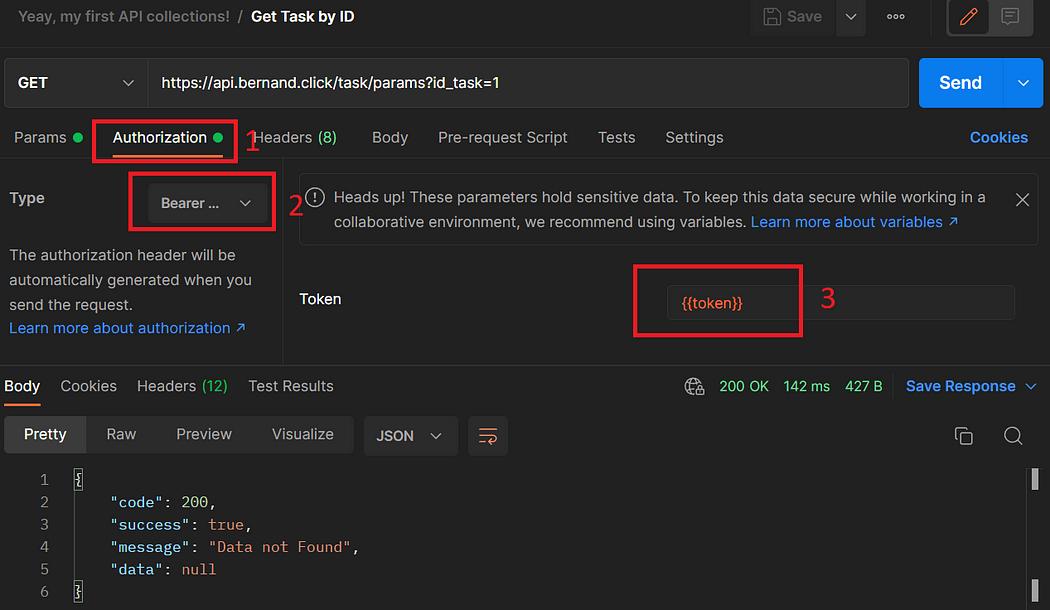
Click the API that need Authorization Bearer (follow the API Resources)
Ex API Endpoint : https://api.bernand.click/task
Pre-Condition : Hit API Endpoint Login to get Access TokenClick Authorization tab
Change Type to Bearer Token
Add token environment to token value with double curly braces : {{token}}

Add Authorization Bearer Token
Section 4: Organizing Requests and Creating Folder
- Creating and organizing requests into folders
To create and organize requests into folders in Postman, follow these steps:
Click Burger Icon (3 dots)
Click “Add folder”

Add New Folder
4. Drag and drop requests into the folder that you created.

Organize API into Folder
- Sharing and collaborating on collections with team members
To share and collaborate on collections with team members in Postman, follow these steps:
- Click on the “Share” button in the top-right corner of the interface.

Click Share
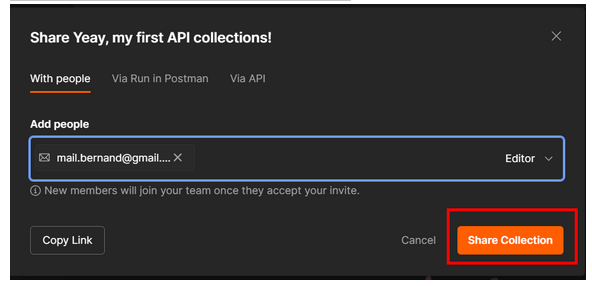
2. Enter the email addresses of the team members that you want to share the collection with.
3. Set the permissions for each team member (e.g., can view, can edit, etc.).
4. Enter the email addresses of the team members that you want to share the collection with.

Add Email to Share
5. Team members can access the shared collection by logging in to their Postman account and navigating to the “Shared with me” section.

Share Collection
Section 5: Testing APIs with Postman
- Writing test and Using Postman’s assertion library to check API responses
Postman’s assertion library allows you to verify that the responses returned by an API meet certain criteria. To use Postman’s assertion library to check API responses, follow these steps:
Open the request that you want to verify the response for.
Click on the “Tests” tab at the top of the interface.
Write your test script in the editor provided. Use the “pm.test()” function to define your assertions.
Save your test script by clicking on the “Save” button.
Run the request to see the results of your assertions.

Postman Test Script with Assertion
For more Assertion please open link :
https://learning.postman.com/docs/writing-scripts/script-references/test-examples/
Section 6: Debugging and Troubleshooting with Postman
- Using the Postman Console for debugging
Postman Console is a feature that allows you to view the details of each request and response, including the headers, body, and timing information. To use the Postman Console for debugging, follow these steps:
Click one of API List
Send a request from Postman.
Click on the “Console” button in the main menu.
The details of the request and response will be displayed in the console.

Debug

References
https://learning.postman.com/docs/introduction/overview/
https://www.postman.com/postman/postman-public-workspace/documentation/i2uqzpp/postman-api